OSPF Cisco Configuration
OSPF (Open Shortest Path First) protocol is a well-known routing protocol that is widely used today. To configure a network for
OSPF properly there are some steps. For basic
OSPF Cisco Configuration, the following scenario will be a good example.
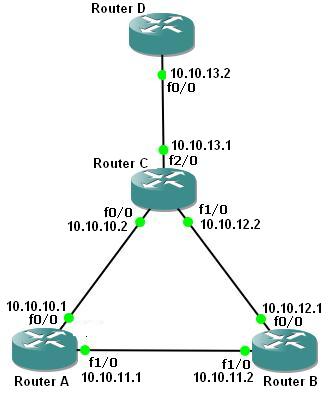
 Single Area OSPF Configuration Topology
Cisco OSPF Configuration Steps
First of all, we will configure the routers’ interfaces. After that we will configure
OSPF as our
Routing Protocol. Here we assume that all the interfaces including loopback interfaces, their speed, duplex and descriptions have been configured.
To do
OSPF Cisco Configuration, follow the below steps:
Enabling OSPF Process
In the router A, we will enable
OSPF Process, with Process Number “
1“.
A(config)#
router ospf 1
A(config-router)#
Adding OSPF Networks
After enabling
OSPF process on our Cisco Router A, then, we will add our networks that will be in OSPF network with their wildcard masks.
A(config-router)#
network 10.10.10.0 0.0.0.255 area 0
A(config-router)#
network 10.10.11.0 0.0.0.255 area 0
A(config-router)#
end
Saving OSPF Config
A #
copy running-config startup-config
OSPF Config on Router B
We will configure Router B like Router A. We will enable
OSPF and then add OSPF Networks.
B(config)#
router ospf 1
B(config-router)#
network 10.10.11.0 0.0.0.255 area 0
B(config-router)#
network 10.10.12.0 0.0.0.255 area 0
B(config-router)#
exit
B #
copy running-config startup-config
OSPF Config on Router C
We will configure Router C like Router A. We will enable
OSPF and then add OSPF Networks.
C(config)#
router ospf 1
C(config-router)#
network 10.10.10.0 0.0.0.255 area 0
C(config-router)#
network 10.10.12.0 0.0.0.255 area 0
C(config-router)#
network 10.10.13.0 0.0.0.255 area 0
C(config-router)#
end
C#
copy running-config startup-config
[sc name=”ContentRMessage”]
You can download “Cisco Packet Tracer” in Tools section.