Routing Policy Configuration on Juniper Routers
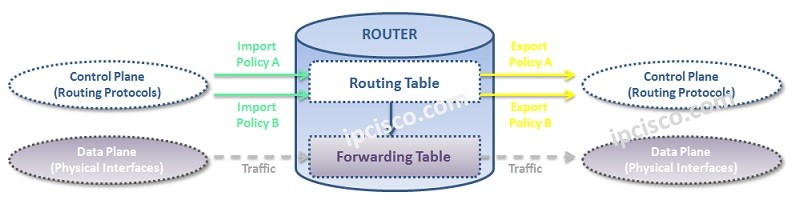
Routing Policies are the rules that allows you to control and modify the default behaviour of the routing protocols like RIP, OSPF, IS-IS etc. With this control and modify mechanims, you can arrange the routing facilities for your network needs.
A Routing Policy consist of different “terms”. This terms include “match” and “action” parts. A basic meaning of this is, the matched traffic with “match” field is behaved according to the “action” field.
To use a Routing Policy, firstly you need to create it. After this, you can use this policy by applying them to the routes.
Let’s see how to write a routing policy step by step.
Before Routing Policy Configuration, let’s configure a basic Prefix List that we will use in the policy. Our Prefix List name will be OurPrefixList.
junos-user@Kosem> configure
[edit]
junos-user@Kosem# edit policy-options

[edit policy-option]
junos-user@Kosem# prefix-list OurPrefixList

[edit policy-option prefix-list OurPrefixList]
junos-user@Kosem# set 192.168.1.0/24

[edit policy-option prefix-list OurPrefixList]
junos-user@Kosem# set 192.168.2.0/24

[edit policy-option prefix-list OurPrefixList]
junos-user@Kosem# set 192.168.3.0/24

[edit policy-option prefix-list OurPrefixList]
junos-user@Kosem# set 172.16.10.0/24

[edit policy-option prefix-list OurPrefixList]
junos-user@Kosem# set 172.16.20.0/24

[edit policy-option prefix-list OurPrefixList]
junos-user@Kosem# commit
commit complete.
Now, we cacn focus on our Routing Policy configuration.
A Routing Policy can be configured under “
policy-options”. To create a Routing Policy, firstly, we need to go under policy-options. Prefix Lists are also configured under this hierarchy.
[edit]
junos-user@Kosem# edit policy-options

[edit policy-options]
junos-user@Kosem#
[sc name=”ContentRMessage”]